Looking for a way to run usability testing sessions and get feedback on your Testflight beta app? You can do it on Trymata – here’s how.
How to set up usability testing on a Testflight app
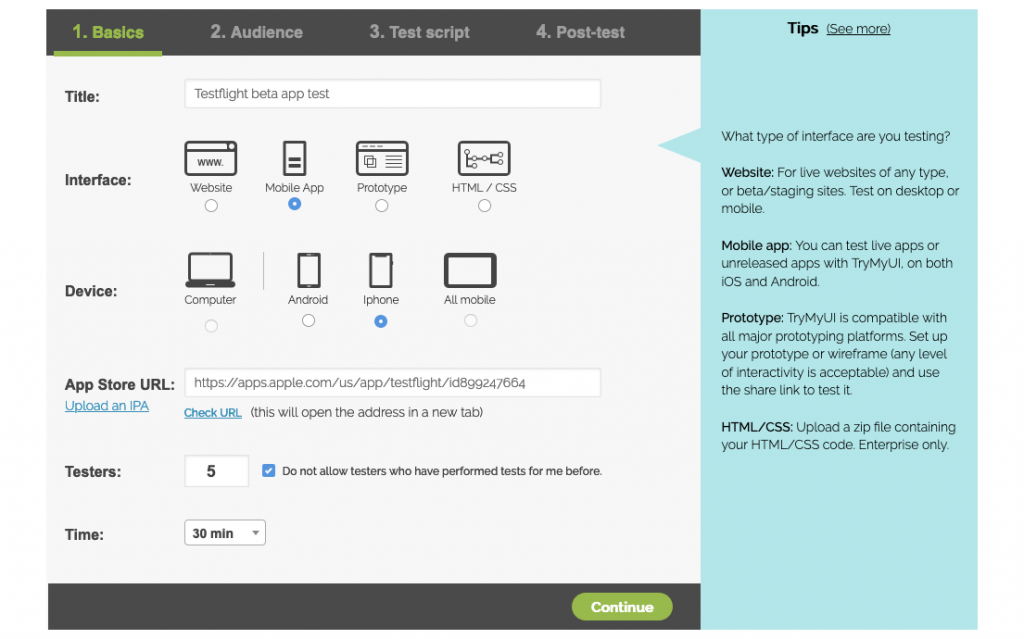
When setting up your Trymata usability test, choose “Mobile app” as the interface type, and “iPhone” as the device type.

Then, in the App Store URL text box, paste in the App Store link to the Testflight app – not to your Testflight beta app, but to the Testflight app itself.
The idea is that you’re setting up Testflight as the interface the test is taking place within, so that’s the target app that users will start with, not your beta app.
You can’t directly start with your own beta app link because the users wouldn’t be able to access it anyways until they’ve already installed Testflight first.
Writing the usability testing script
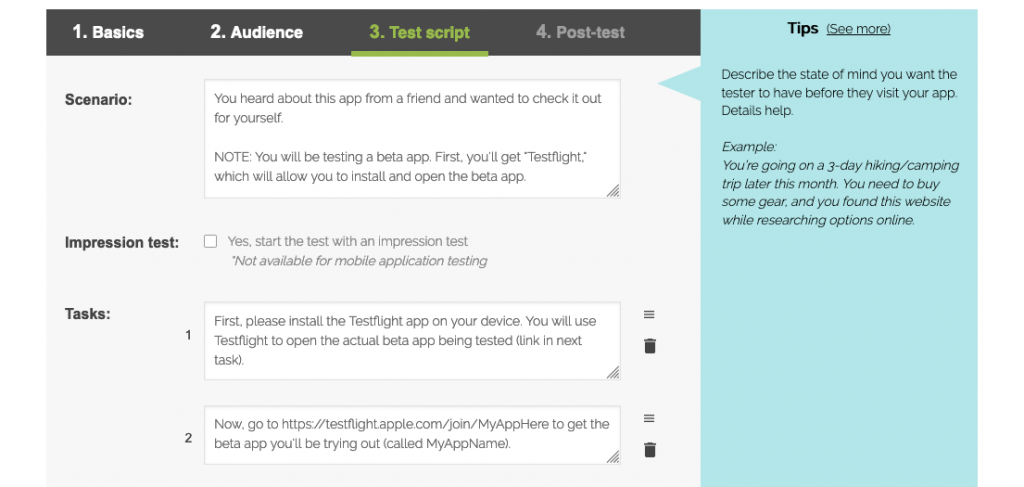
The next part is writing a scenario and tasks that will help users understand what they need to do, and then get them to the right starting point.

“NOTE: You will be testing a beta app. First, you’ll get “Testflight,” which will allow you to install and open the beta app. This note quickly sums up what they can expect, without going into unnecessary detail.”
Register for our FREE trial that includes 5 user testing videos with full features!
After reading the scenario, users move on to the first task. You should use this task to have them install Testflight, and also to explain that Testflight is not the app they’ll be testing, but just a means to access the real target app.
1. “First, please install the Testflight app on your device. You will use Testflight to open the actual beta app being tested (link in next task).”
In the second task, link users to your beta app invite page. When you put a link in a Trymata task, we automatically hyperlink it during the test, so users can just tap on it to directly open the page (please note the URL in the sample task below is fake, but is used to show the Testflight URL pattern).
2. Now, go to https://testflight.apple.com/join/MyAppHere to get the beta app you’ll be trying out (called MyAppName).”
After this point, the users will now be on your beta app. Starting with task 3, use the remainder of your test script to guide users through the interactions you want to see and get feedback on.
For tips on writing your tasks, check out the articles below:
Vol. 1: How to write usability testing tasks
A basic look at writing usability testing scripts, using an example setup from a comparative test between Pizza Hut and Domino’s.
Vol. 2: Usability testing tasks for e-commerce tests
Tips for writing test scripts for e-commerce platforms, with example scripts from an H&M mobile web test and a desktop test on Amazon.
Vol. 3: Usability testing tasks for prototypes & wireframes
Our advice on writing a prototype testing script – the example used is from a test of a non-interactive InVision prototype, and contains useful insights for testing an interface with minimal functionality. It’s also a good meditation on thinking about your tasks from the user’s perspective.
We hope this article has been useful for you. To get started with user testing your Testflight beta app, sign up for a free trial of our usability testing platform.


