


We’re thrilled to announce that you can run moderated usability tests with TryMyUI! In case you missed it, the prior post on our blog talked all about how to set up your first moderated test.
If you’ve just come from there, keep reading to learn more about the process of actually moderating a live test session…
How to run your moderated TryMyUI test
Once you’ve set everything up and ordered your moderated test, there’s nothing to do but wait until the day of your test (which might be just a 24-hour wait!)
If you’ve included any screener questions in your test setup, potential testers will be able to start answering them as soon as you place your order. When you visit your test page, you’ll be able to see how many testers have already pre-qualified.

When the scheduled start time for your moderated test is less than 30 minutes away, you’ll start seeing an option to launch the test room. Clicking this opens up the invitation page, where you’ll see a countdown timer to the start of the test, and an “Invite tester” button.
At the same time, the waiting room for the testers opens, and eligible potential testers will start queuing up to take the test.
Inviting the testers
Whenever you’re ready, click the “Invite tester” button to send an invitation to the first tester in the queue.
Try to send the first invite close to the exact start time – we recommend up to 5 minutes before or after. While it’s possible to send it at any time in the lead-up to the test, keep in mind that the testers may not be ready yet. Conversely, don’t wait too long to get started and leave everyone in the queue waiting. (If no invite is sent within 15 minutes after the scheduled start time, your test will automatically be canceled).
When you send the invite, the tester that is #1 in the queue will see an invitation appear on their screen, with a 30-second timer to accept. When they accept, you will both be redirected into the live call in-browser, where you’ll begin the moderated session.
In case the tester declines the invitation, or fails to accept within the 30-second window, you’ll be able to send a new invite to whoever is next in line.

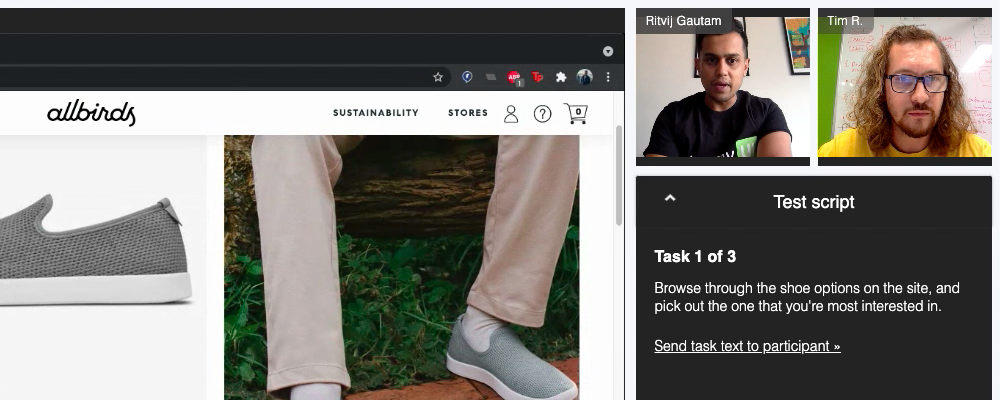
Conducting the live session
In the live call, you and the tester will be connected via face and voice chat. The tester’s screen won’t immediately be shared, so just instruct them to do so any time before beginning the tasks.
Along the bottom bar, you’ll have a row of controls, and in the right-hand column, you’ll have a sidebar with sections for viewing the test script, taking notes, and seeing who is in the room.

The “Test script” section will be open by default. This section will show one task at a time, with forward and back buttons to navigate through your script. The tester won’t see the tasks on their side automatically, but you’ll have an option under each task to send it as a message that they’ll receive in their own sidebar.
 If you include an Impression Test in your setup, you’ll click to manually load the webpage for them at the start, and after the 15 seconds is over, you’ll have the list of follow-up questions to read from (the tester won’t see these, so feel free to ad-lib your own questions as needed).
At the end of the Scenario step, you’ll have a link to load the website up for the tester. This will trigger your URL to open in a new tab in their browser.
You may want to ask them to click on “Pop out camera” on their screen beforehand – this will play your camera feed in picture-in-picture mode for them, so they can still see your face while they’re in the other tab.
As you proceed through your task script, you’ll be able to fill in the task completion and usability data if you’ve included it in the setup. For the completion question, you may want to just select the answer based on your own analysis, rather than asking the tester to answer it. For the usability rating, ask them how they would rate it and fill in their response.
 The “Notes” section is a place for you to jot down your notes on the session as it unfolds. After typing in your note, hit the Enter key and it will post to the notes feed, with the timestamp you sent it at.
Later on, when you or your colleagues watch the saved video recording, your notes will be saved as annotations, with the same timestamp and a play link to jump to that part of the video. You can edit the notes (text as well as start and end points) at that time.
The “In this room” section will show the names of everyone present in the call. Of course, for now that will only be you and the tester every time. In the near future, you’ll be able to have observers join your moderated sessions as well. You’ll see the observers in this section then; they’ll also be able to send notes in the Notes section.
Ending a moderated session
When you’ve finished with a session, just click the “End session” button in your control bar along the bottom. The session won’t end immediately – first, you’ll have a confirmation popup asking whether or not the test was satisfactory.
Choose “yes” if the session was completed successfully. You’ll be able to assign a specific star rating later if you want; this question is just for us to know whether or not to count that session towards the total you ordered.
If there was something wrong with the test and you weren’t able to get a complete session done – for example, an issue with the microphones or screen sharing, or the tester dropped from the call, or the tester turned out not to meet your criteria – choose the “no” option, and we’ll throw out all the data for that test. It will not count against the total number you ordered.
In either case, after confirming, you’ll land back at the invitation page. If you still have more sessions to do, the “Invite tester” button will be there to initiate the next call when you’re ready.

Getting started with TryMyUI moderated user testing
If you’d like to try our new moderated testing feature first-hand, sign up for a free 2-week trial of our platform. You’ll be able to check out this and many other powerful aspects of our user testing suite.
For even more information about running live moderated sessions, visit our ‘What to expect’ page, or watch the video below to see it in action!